
How to Organize and Edit Your Travel Photos: Part 1
It’s completely normal for me to take thousands of photos even if a trip is a week or many days like several weeks. But how do I deal with so many images once you arrive home? Here is my process for how I edit and organize my travel photos. This is part 1 of 2.
I can usually be found with a camera in my hand whether I'm home or traveling. I am in love with taking photos regardless of if it's on my iPhone, GoPro, DSLR camera or my mirrorless Nikon camera (which is new to our family!).
As a professional photographer, I know a thing or two (or ten) about editing photos.
I mention two programs in this post, including:
- Finder (a Mac computer application/program for file viewing – PC's equivalent is “My Computer”)
- Photo Mechanic by PhotoShelter
Note: if you are looking for Part 2 of this post, click here.
Let's Get Started…
Post Contents
Overview of How to Organize and Edit Travel Photos
For purposes of this post, I’m going to work with my images of Spain from a recent trip. The overview of my file structure looks like the following:
- Main Folder (trip/country name)
- Subfolders of final pictures of cities, excursions, or attractions within that country
- RAW files
- Subfolders of RAW files per cities, excursions, or attractions
My Spain trip, at a glance, would look like the below:
- Spain 2017
- Madrid
- Cordoba
- Granada
- Seville
- RAW files
- Madrid RAW
- Cordoba RAW
- Granada RAW
- Seville RAW
I don't worry about naming the individual image files just yet (that is, to say, every single image isn't named yet with anything but what filename the camera assigns to the data).
I’ll do that later after I edit and export them, which I write about in Part 2 of this process.
Set Up and Appropriately Name Your Folders
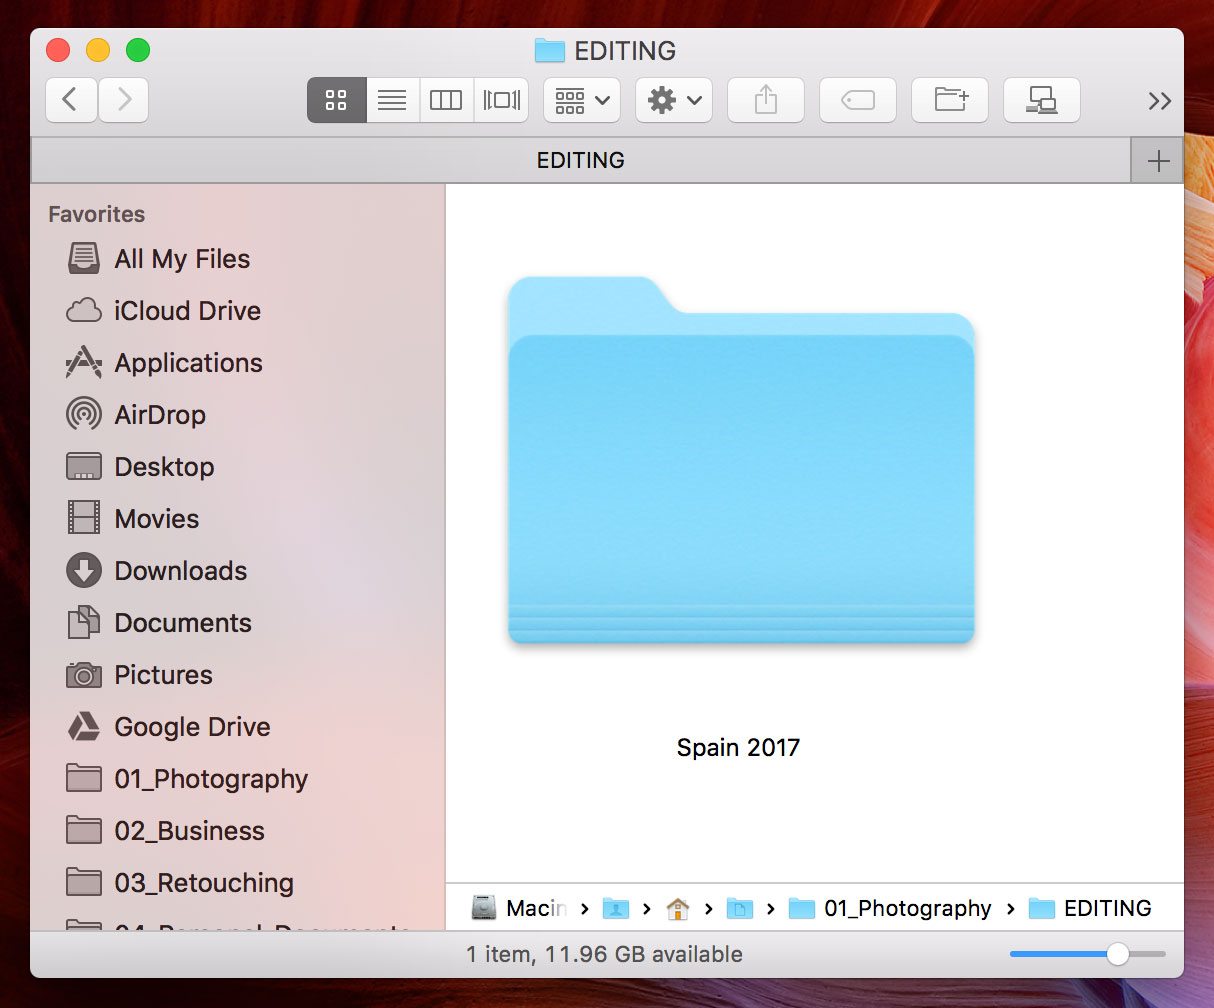
I start editing any trip with a simple folder structure on my computer. The first step of this process is to create and name your main folder. This is my “Spain 2017” folder.
I am a stickler for properly naming folders!
That way when you come back to it years from now, you’ll be able to quickly identify what’s in the folder. Additionally, it will help you easily locate the images from your “Spain 2017” trip if you’re ever doing a computer search to find them.
Create Subfolders
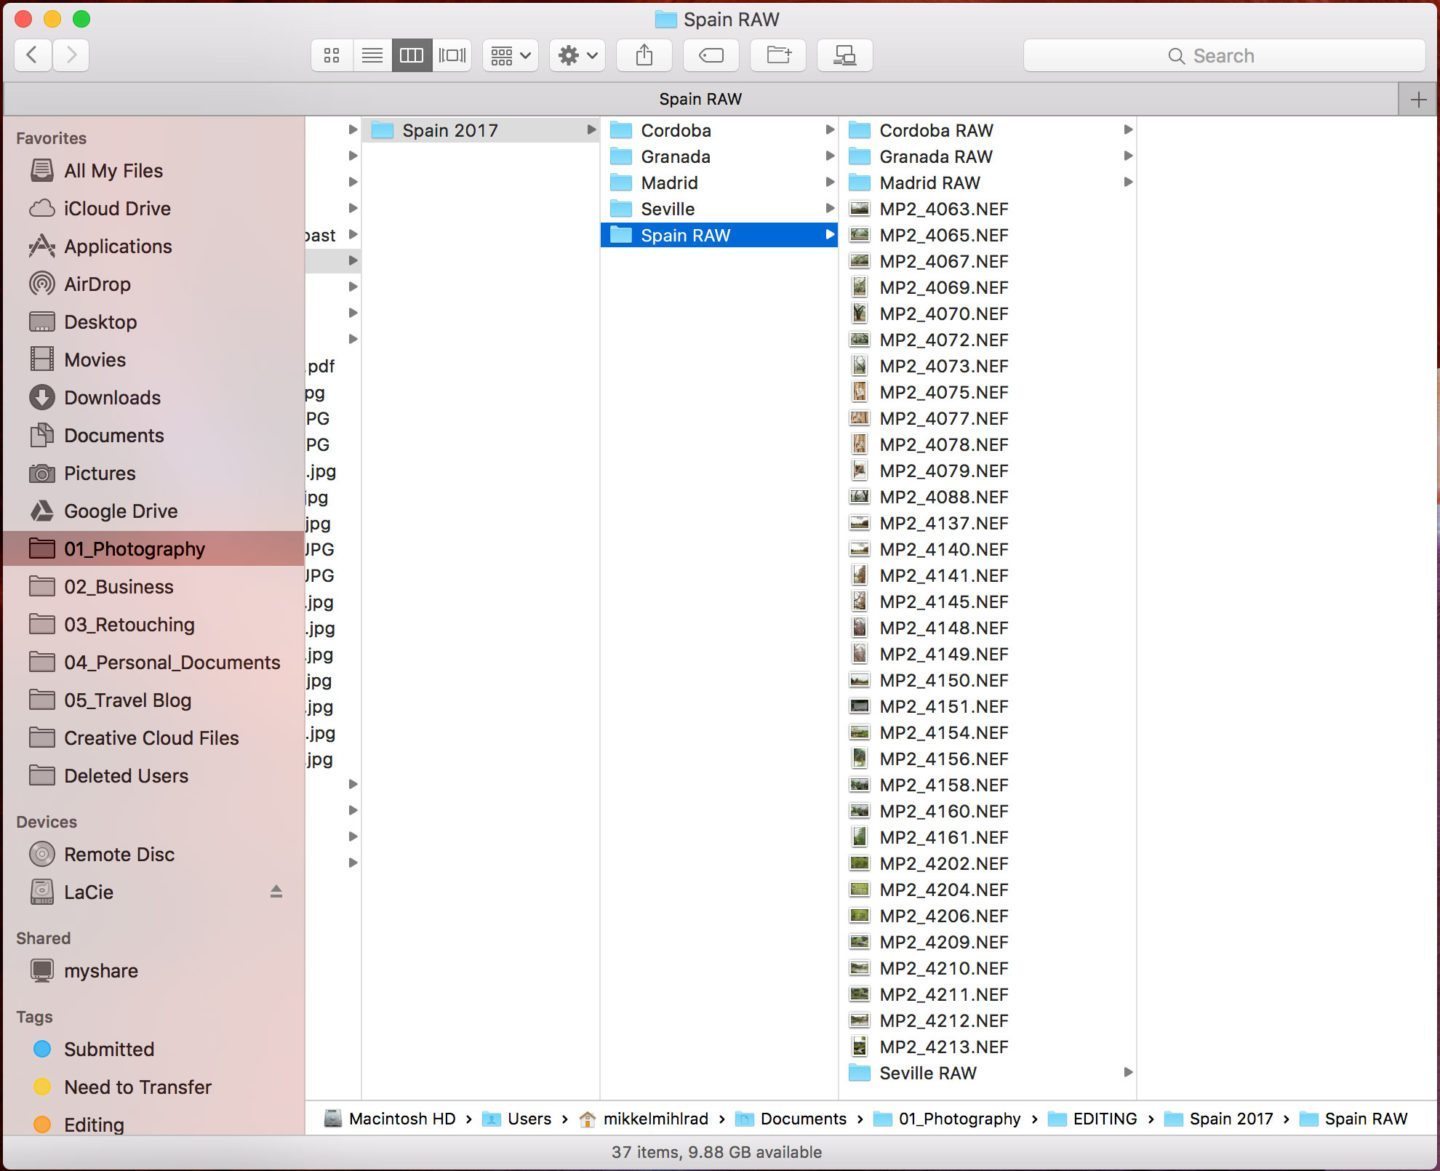
Next, I’ll create subfolders within the main folder. I usually do this per city I’ve visited or, if there are enough photos from something within the city, create folders per attraction. For instance, for Spain I created the below:
- Madrid
- Cordoba
- Granada
- Seville
The above folders will remain empty for now.
Transfer Files from Your Camera to Computer
I create a very important folder named “ Spain 2017 RAW,” within the main Spain 2017 main folder, where all my RAW images will go.
(Note: there are two main formats to photograph images in, commonly JPG or RAW format. I shoot in RAW. RAW files are larger because they record more data, which allows me more freedom in editing.)
I copy the above subfolders into my Spain 2017 RAW folder and add “RAW” the end of the folder name. These are my working folders that I'll edit and export my final images from.
- Madrid RAW
- Cordoba RAW
- Granada RAW
- Seville RAW
After the folders have been set up I'm ready to transfer my files from my camera to the computer. I insert my memory card directly into my computer (or through a card reader) and transfer all my camera images in the Spain 2017 RAW folder.
Now the fun organization of the actual images begins!
Divide Your Images
I divide my images so the editing process is more digestible. This way I can edit “Cordoba RAW” folder in its entirety in one sitting in case I can't edit all of my Spain photos in one day. And with thousands of images, that's usually the case.
I open two Finder windows and ensure I’m in thumbnail view so I can see previews of the images. (I’m on a Mac computer and “Finder” is a Mac program used to view and organize files. On a PC it's usually done in “My Computer”.) I navigate to the below in two separate windows (screenshot image below):
- Finder Window 1: Spain 2017 RAW
- Finder Window 2: Cordoba RAW
I ensure I'm viewing the thumbnail versions of my images. I then drag all images I see from Cordoba, from Spain 2017 RAW general folder into the Cordoba RAW folder.
Repeat the above “Dividing Your Images” steps for each folder. So, for example, next, I would drag and drop all images I see from Madrid from Spain 2017 RAW folder into —> Madrid RAW folder.
Notice the Finder folder names at the top of each Finder box in the image below. The name at the top of the box indicates what folder I am in.
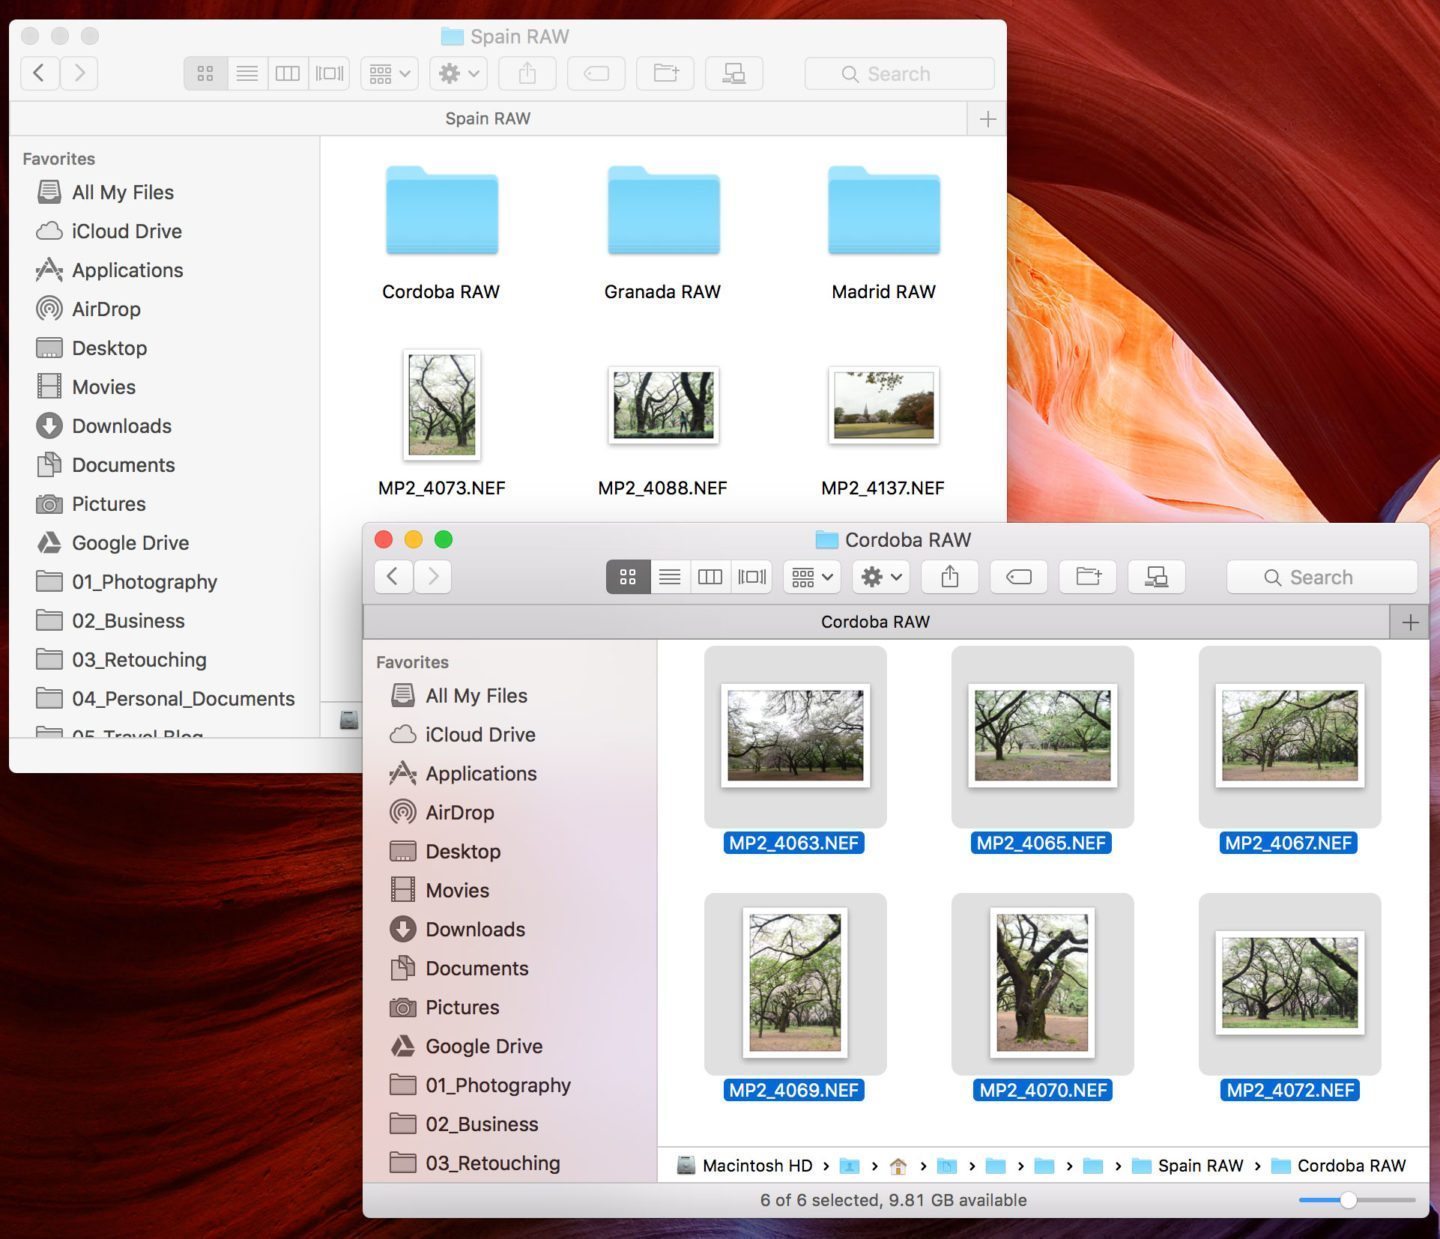
At the end of this step, you should have no images left in the general Spain 2017 RAW folder, only images in the RAW subfolders. (In other words, only folders will be within “Spain 2017 RAW,” including a folder of RAW images per city; Madrid RAW, Granada RAW, Cordoba RAW, Seville RAW.)
Cull Your Images
Culling is the process of choosing your selects from your images. These will be the photos I eventually import to Lightroom and edit.
For culling, I use a program called “Photo Mechanic,” by Camera Bits. This is a wonderful tool that quickly allows me to view RAW files and make the decision: Is it a select or not?
I’m often asked, “Can I cull in Lightroom?” The answer is yes but I’ve found it’s much faster to cull in Photo Mechanic. Since I have so many images to edit every week (between travel and wedding photography) time is of the essence.
Photo Mechanic has a free 30-day trial version. If you like it after 30 days have passed you can purchase a license for a one-time fee of $150, which is a great price! If not, no worries! Do what works for you.
Here’s how I cull images to choose the selects I'll edit in Photo Mechanic:
Open a new window on the top navigation bar of the program
- File > New Window
Navigate to the folder you wish to view
The folder I want to view in this case is Cordoba RAW. You simply find the folder in the left-hand column of the screen, just like you would in Finder.
View images by Capture Time
I like to view the images in chronological order.
This helps organize images if you've transferred images from multiple sources onto your computer (like your iPhone and camera) and the capture times are synced.
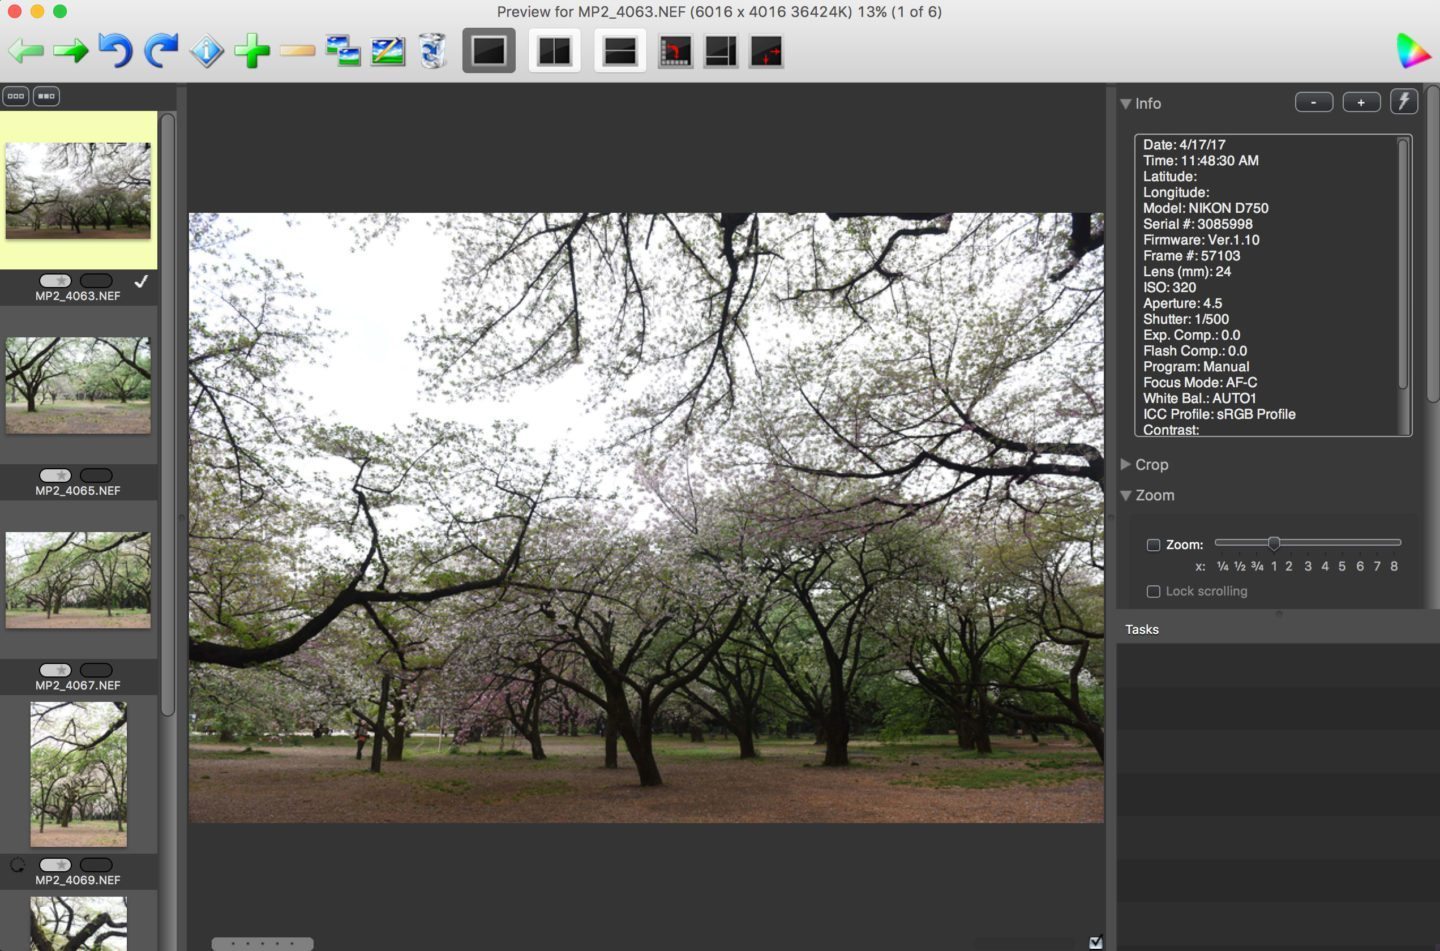
I've circled the area where I can set it to view in “Capture Time” in the below screenshot in blue. Other viewing options include Filename, Rating, etc.
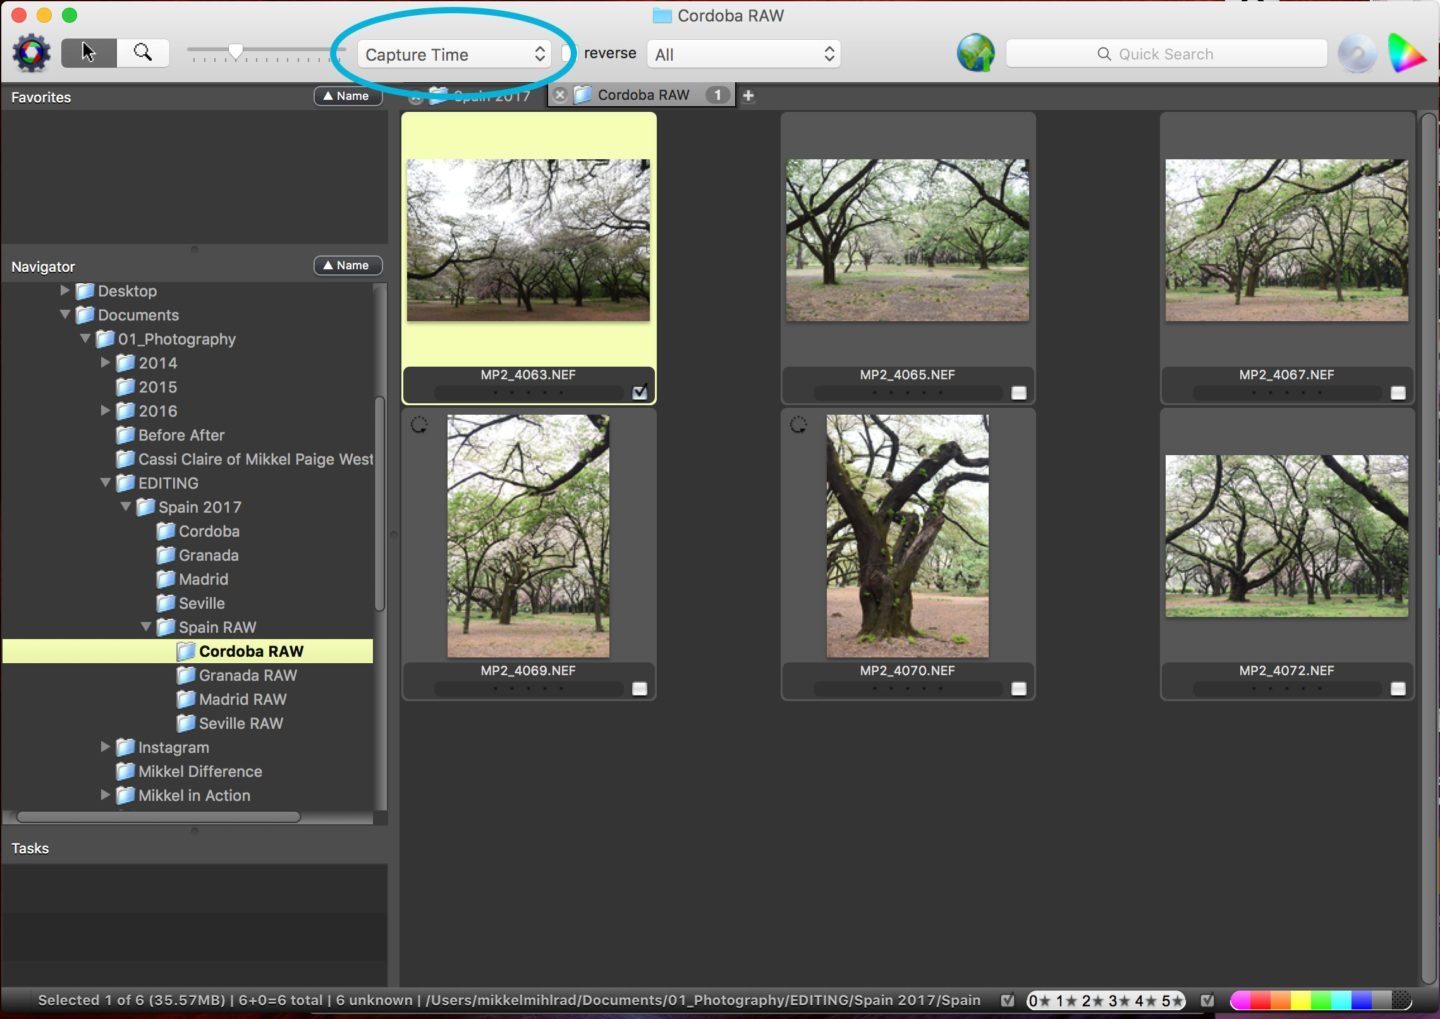
Enlarge the thumbnails for better viewing
I like to see the images a little larger than thumbnails as I cull. It helps me ensure the image is in focus and I simply can make a better decision more quickly if they're enlarged.
To do so, I simply double-click on a thumbnail image and it opens an enlarged view. Another window pops up that looks like the below screenshot:
Choose selects with the stroke of one key
There’s just ONE very simple keystroke I need to cull my images: t
- If I like the image and want to keep it as a “select”: I click “t” and it checks the images, as seen in the screenshot above on the yellow highlighted image in the left-hand column.
- If I don't like the image and it's not a select: I do nothing. I simply pass it and leave it as is, which should be unchecked.
- Note: to reverse a check, simply hit “t” again and it will uncheck it.
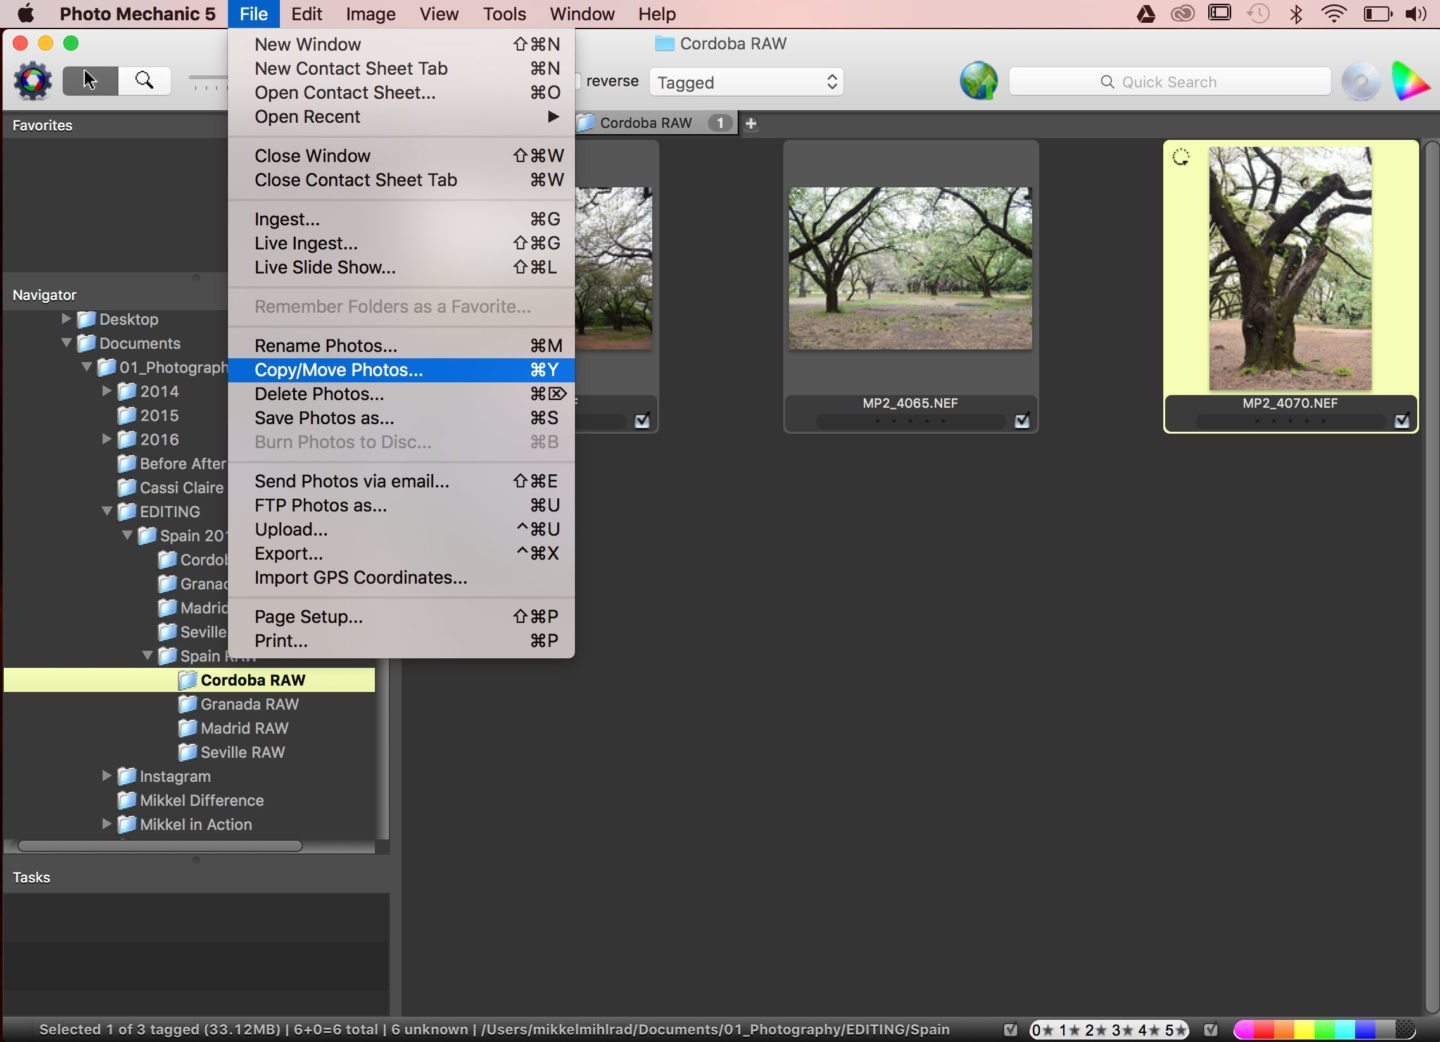
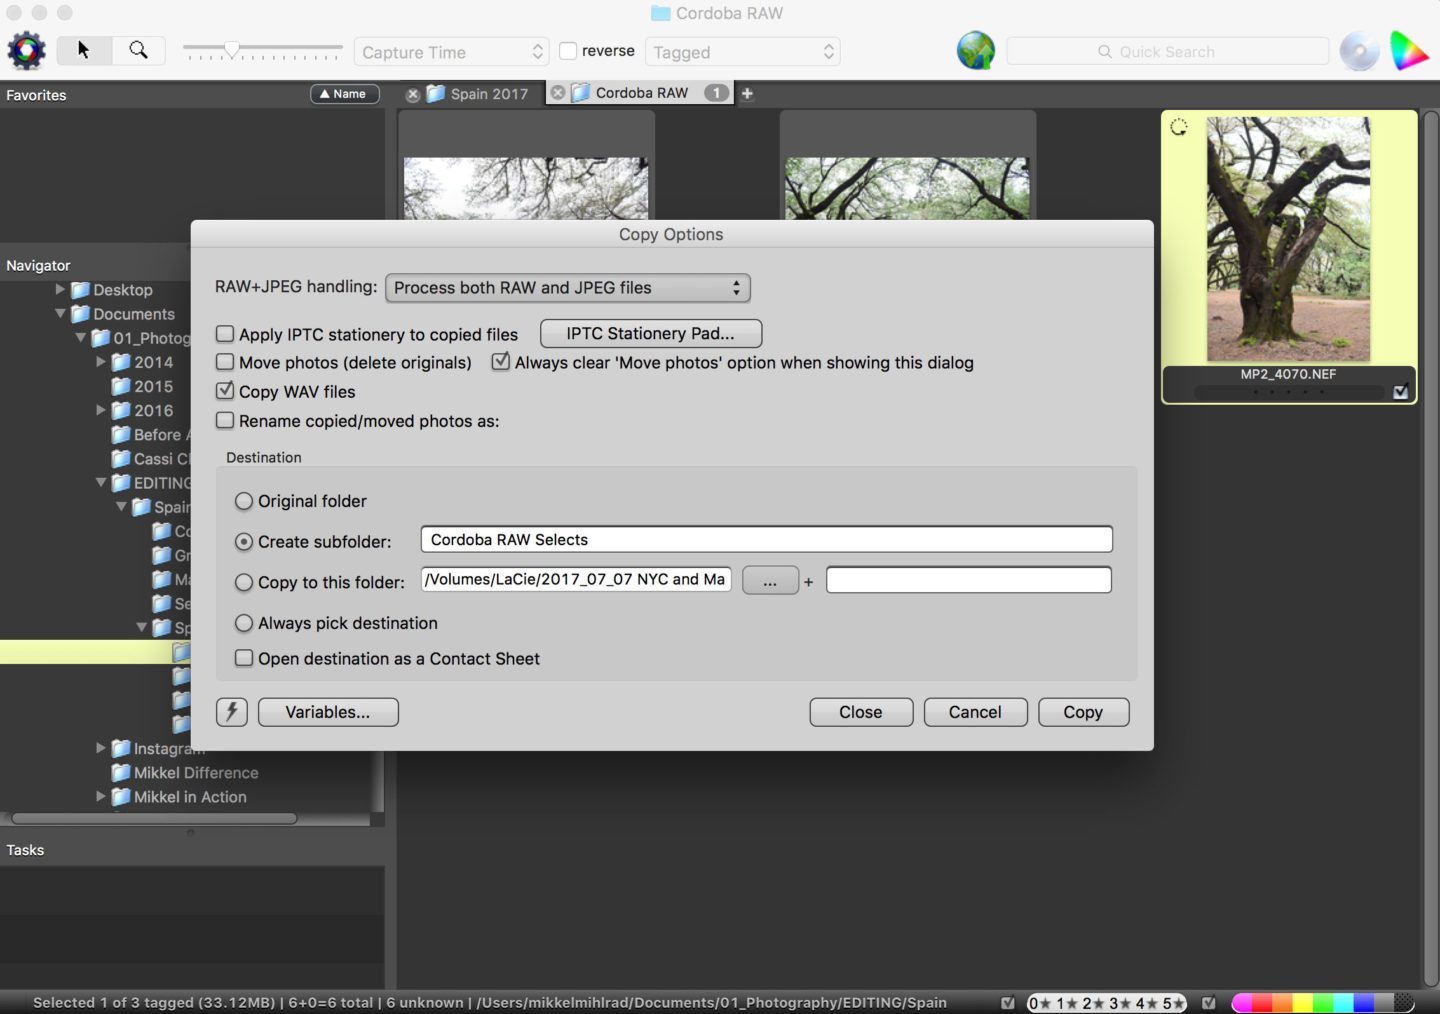
Copy your selects to a new subfolder
I then copy the selects to a new subfolder created within Photo Mechanic when I've gone through and completed my selects for the entire folder. To do so, simply view the navigation bar at the top of the program screen while in Photo Mechanic and go to:
- “View”
- “Tagged”
This will show only your tagged images, which are your selects.
To create a new folder with your selects go to the following on the navigation bar:
- “File”
- “Copy/Move Photos”
In the dialog box that appears I select “Create Subfolder” and name it the same name as the folder I'm editing but I add the word “Selects” to it. So my Cordoba RAW Selects folder is my new subfolder.
Repeat Culling, Per Folder
Repeat the “Cull Your Images” steps in Photo Mechanic for each RAW subfolder until you've made your selects for each folder.
How to Organize and Edit Travel Photos, Conclusion and Part 2
We’ll explore what to do with your images once they’re culled in Part 2.
Note that this is the culling and editing process that works for me, after years in the industry. It may not work for you. Or you may find there are bits and pieces of it you really enjoy and find useful and others you wish to tailor to your needs or improve upon, which I encourage.
If you have a question or comment on How to Edit and Organize Travel Photos please add it to the comments below! We reply to every comment and we’re happy to help out.
For other photography tips check out:
- The Definitive Guide to the Best Travel Cameras
- One Thing Everywhere You Travel
- Behind the Scenes: Best Way to Resize Images without Losing Quality for Web


Interesting! I’m always trying to get better about organization with so many photos to keep track of, and often I can’t get around to editing the bulk of them until some time after I’ve taken them. I like the idea of importing RAW files into different folders per city, but my problem is I can’t view the RAW photos even in thumbnail until they are in Lightroom. Do you think that’s a PC vs Mac thing?
I HIGHLY recommend getting PhotoMechanic. You’ll be able to view the RAW in your PC in no time. Even on a Mac it takes a little while to see it in a Finder window (where you see files in thumbnails) but PhotoMechanic is designed to view them really quickly. And yes, it costs money – but think of the time you will save with the program. (Time = money!) And no, I wasn’t paid to promote the program! It’s just really good and worth it.