How to Organize and Edit Your Travel Photos: Part 2
I often take thousands of photos on a trip. No matter the length I am sure to pack my photography gear. This includes a DSLR camera, an iPhone, sometimes our GoPro, and plenty of memory cards. (And now we'll be packing our Nikon Z6II mirrorless camera and our gimbal for video footage too!)
And of course, after the trip we need an efficient way to edit and organize our photos.
I mention two programs in Part 1 of this system. This post contains two more programs. I use one essential program to edit my photos though I have access to two vital programs any photographer should have on hand:
- Adobe Lightroom (my main use program – many photographers use competitors programs like Camera RAW. Lightroom is perfect for my needs. )
- Adobe Photoshop
If I need to take extra care in editing an image I’ll then open it in Adobe Photoshop, but that’s rare for me. Photoshop is an incredible tool and I love it. But it's also time-consuming. Lightroom will speed up your process!
Note that you can subscribe to Adobe Creative Cloud for under $10 per month under their photographer plan, which allows you to use both Adobe Lightroom and Adobe Photoshop. (If you order through the affiliate link below I'll get credit for sending you their way. This will help me be able to bring you even more great content and info on invaluable programs.)
Post Contents
Create a New Catalog
I create a new Lightroom (LR) catalogue for every trip I take. This way, I can easily locate the data if I need to go back to it. You can use one catalog for all your travel photos, for all time but I don't recommend it. Having multiple catalogs for each trip you take allows you to work from a fresh catalog, which will greatly speed up your process. The larger the catalog the slower the program will function. Can you imagine LR having to load five to ten years' worth of trips down the road? It's best to get into the habit of this rule: one trip, one catalogue.
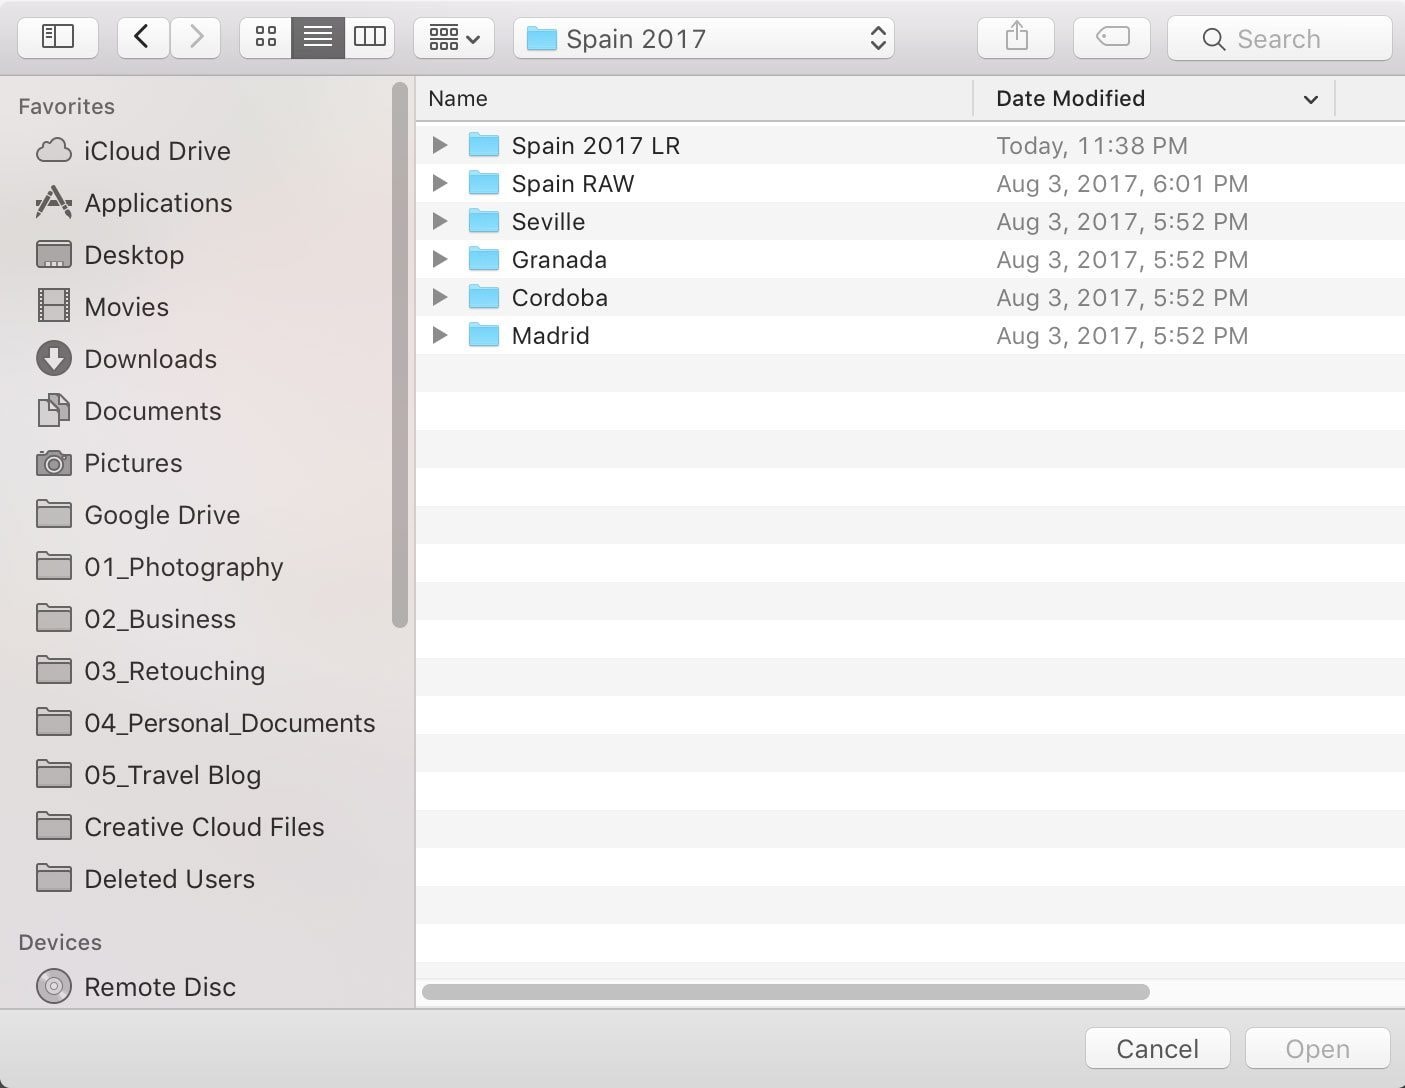
To create a new catalog, simply go to “File,” “New,” on the top navigation bar in LR. Navigate to your “Spain 2017” folder. Create a “Spain 2017 LR” catalog. I personally label all my LR catalogs with the finishing letters “LR” even though the catalog file extension is easy to identify. (All LR catalog's are a “.lrcat” file extension.)
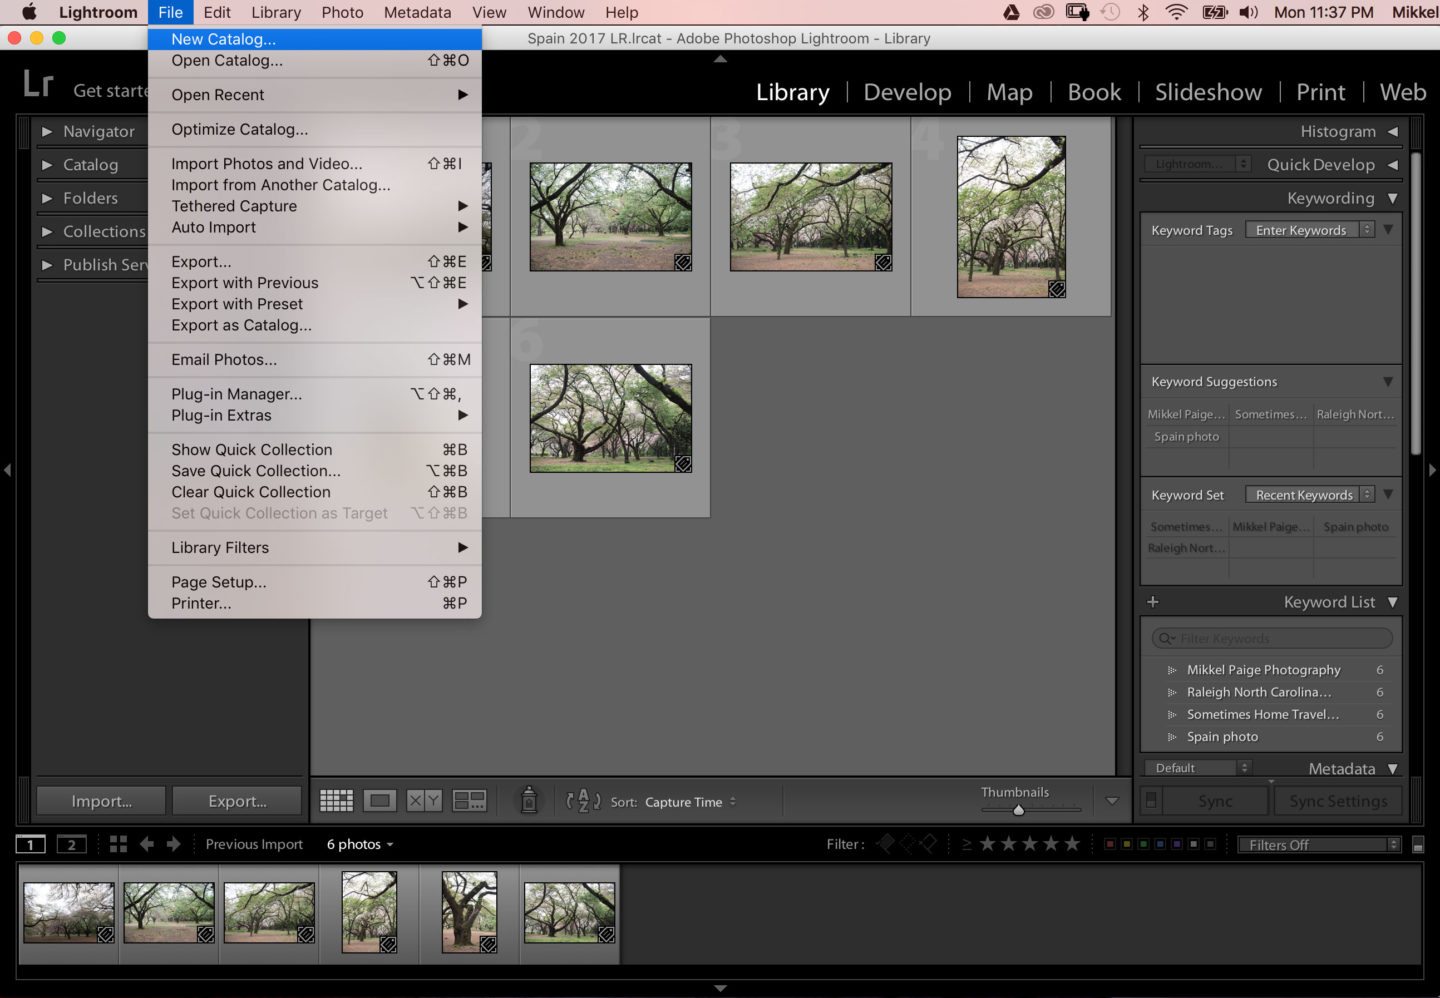
There's no need to create a folder for the catalog. Creating a new catalog automatically puts it in its own folder, which you'll notice at the top of the box pictured below.
Import Your Photos
Once your catalog has been created and is open it's time to import your photos.
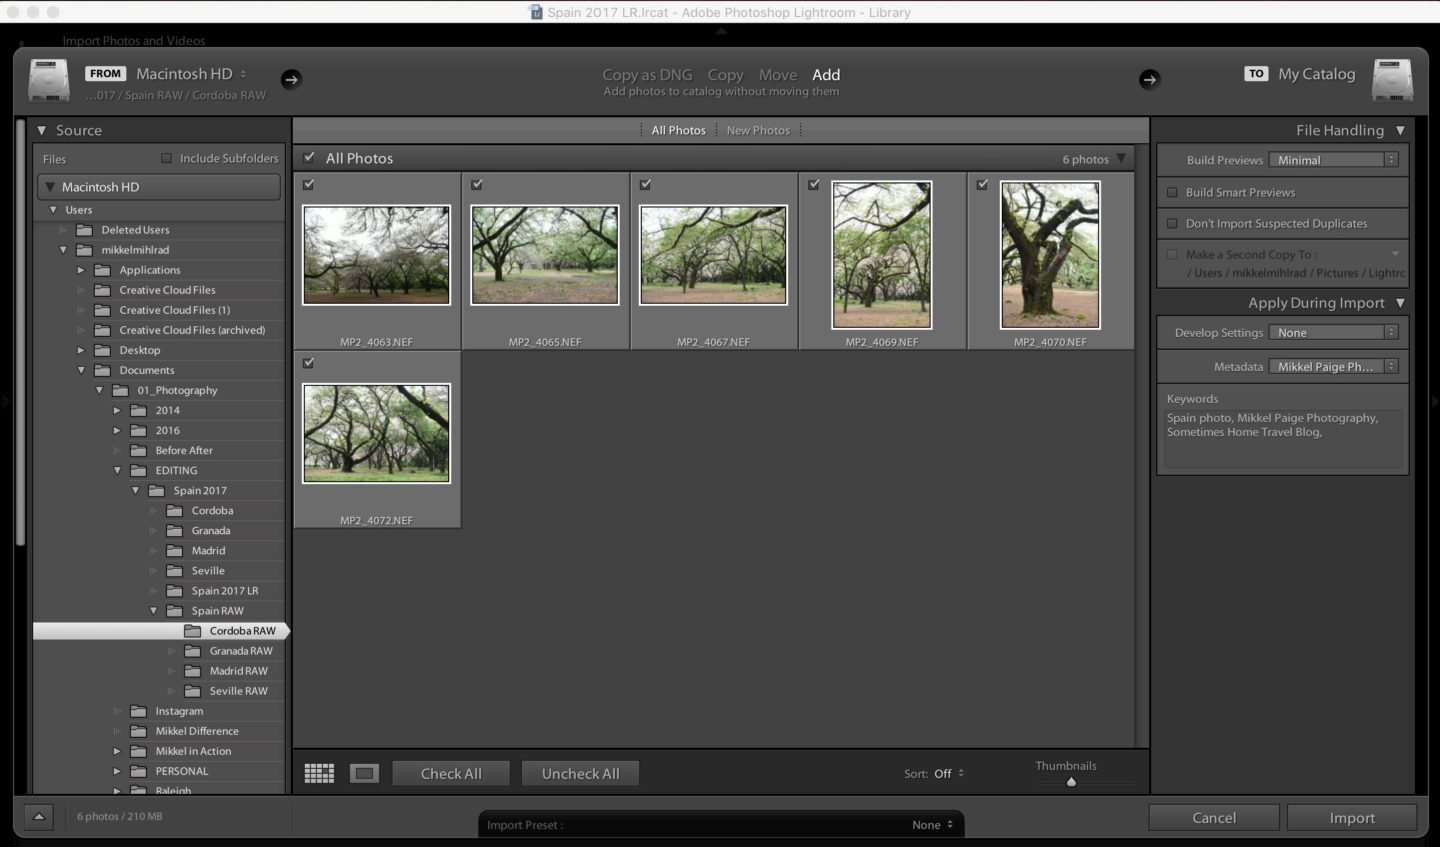
Go to “File,” and “Import Photos and Videos,” on the top navigation bar in LR. You'll have to locate the RAW image file folder you want to begin with. These are the folders we created in Part 1 of this post. You'll navigate to the folder on the left-hand side of the import box, where I have chosen to find the “Cordoba RAW” image folder. You'll add keywords and copyright on the left-hand side of the import box, as pictured below.
A few tips upon import:
- I add a copyright to my images. This is done on the right hand side upon import. Because my photography business is under “Mikkel Paige Photography” that’s what copyright name I use.
- I keyword my images as well upon import. Keywords I add for Spain would be things like, “Madrid photos, Spain travel photos” and the like. I also always add two other keyword phrases for my travel photos, “Mikkel Paige Photography,” and “Sometimes Home travel blog”
Edit Away!
I carefully edit each image in the “Develop” mode in LR, highlighted in blue in the screenshot image below.
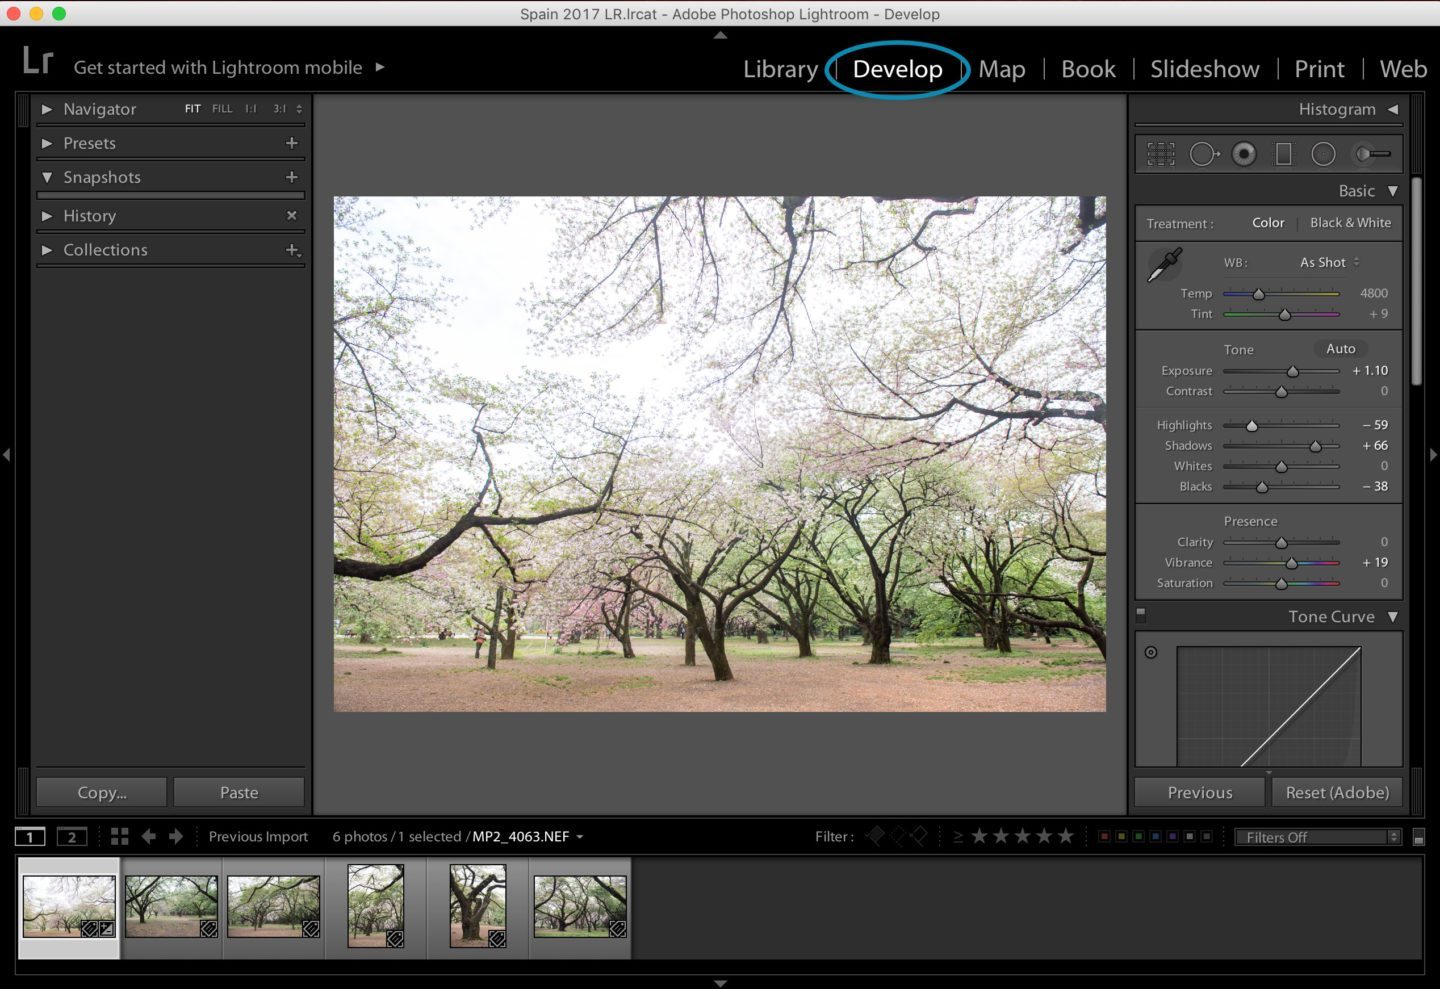
Some images need more attention than others but overall this is what I adjust:
- Lighting
- Color
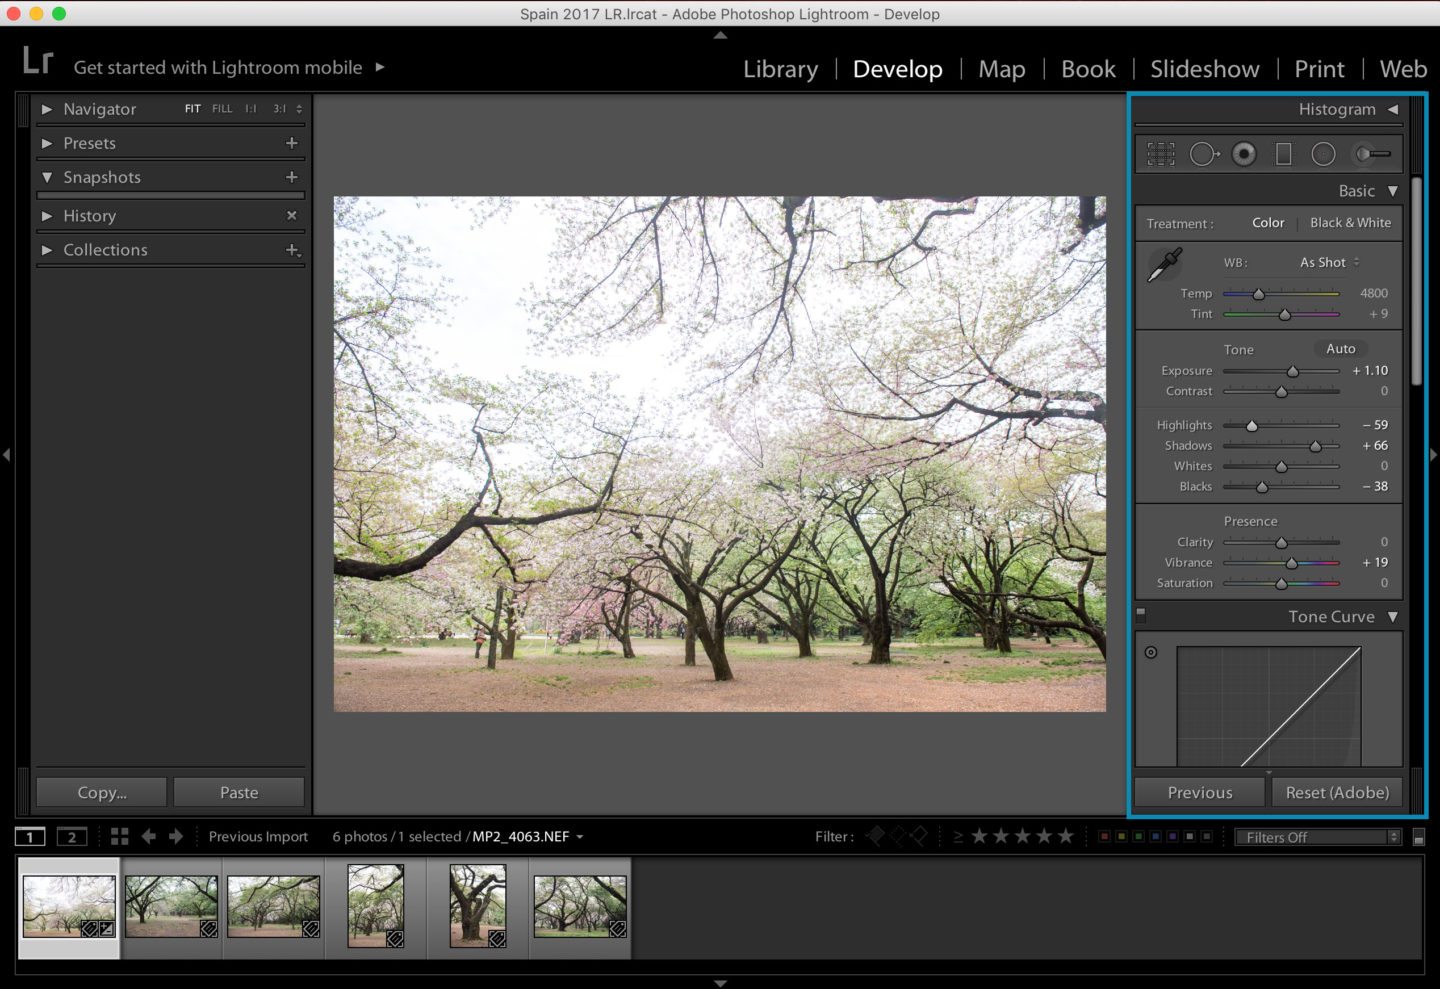
- Horizon line (you can rotate the image with the dashed boxed seen under “history” in the blue rectangle area highlighted on the right side of the screenshot below)
The goal is to always get it right in the camera. If it’s not perfect at least it’ll be close to what I want, thus cutting down on editing time. As months and years go by and you familiarize yourself with the program, your editing style may change. Or perhaps you’ve been in the industry for years and have developed a style you're already comfortable with. No matter what, photography is a journey and everyone's edit technique in the Develop mode is sure to vary.
Rate and Filter as I Edit Images
Lightroom has so many wonderful tools for rating images. They have built-in tools to help notate what’s a top-notch image, or a select, or color-coding system for your own purposes. There are two main systems I use for Lightroom:
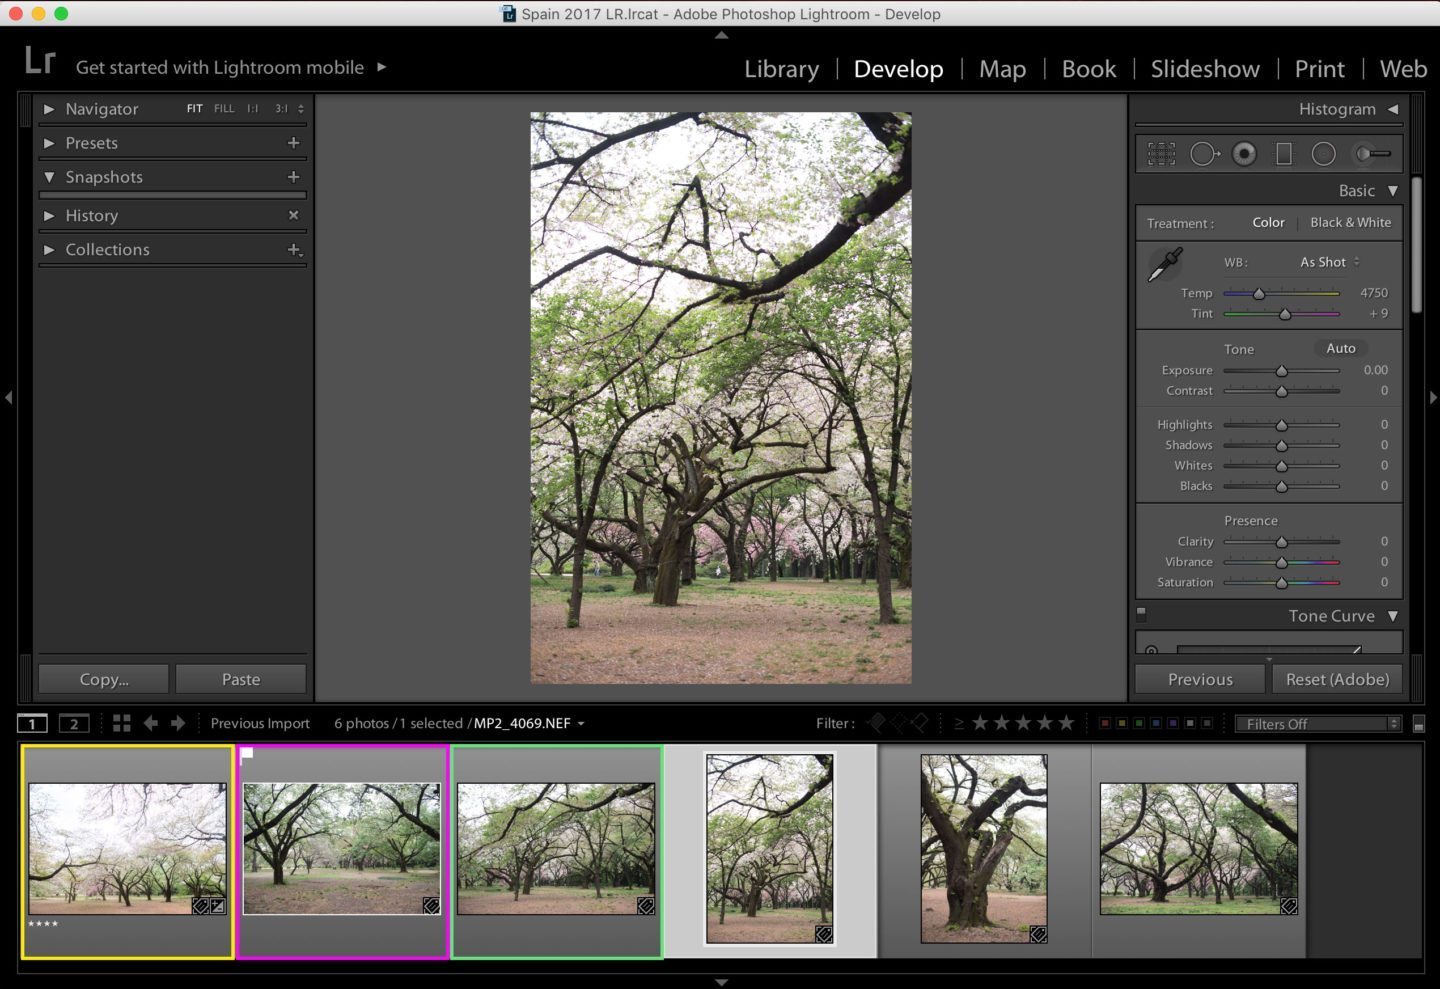
- Stars: I rarely rate anything below a 4 or 5 star image, but if I love the image I’ll give it a 4 or 5 star depending on my reaction to it. This is useful if I want to view the images later on and quickly identify the standouts. A starred image is noted in yellow, below.
- Pick: I’ll quickly click “P” for “pick” for an image. If it's not a “pick,” or not a select I do not hit “P.” That's seen in both pink (picked, indicated with a little white flag in the upper lefthand corner of the thumbnail version of the image that LR adds) and green (not picked and no flag) below. Yes, we did this process already in Part 1 of the culling process in Photo Mechanic. In Photo Mechanic the shortcut to “pick” an image is hitting the keyboard letter “T.” However, sometimes upon second viewing I decide the image isn’t so great or there’s a better image that portrays the same thing. So I end up tagging the catalogue’s images again. Anything not tagged, which essentially means it is not a select, doesn’t make the final export.
Exporting Images
This is where naming my files comes in. I love the feeling when I have finished editing a batch of images and it's time for the final touch.
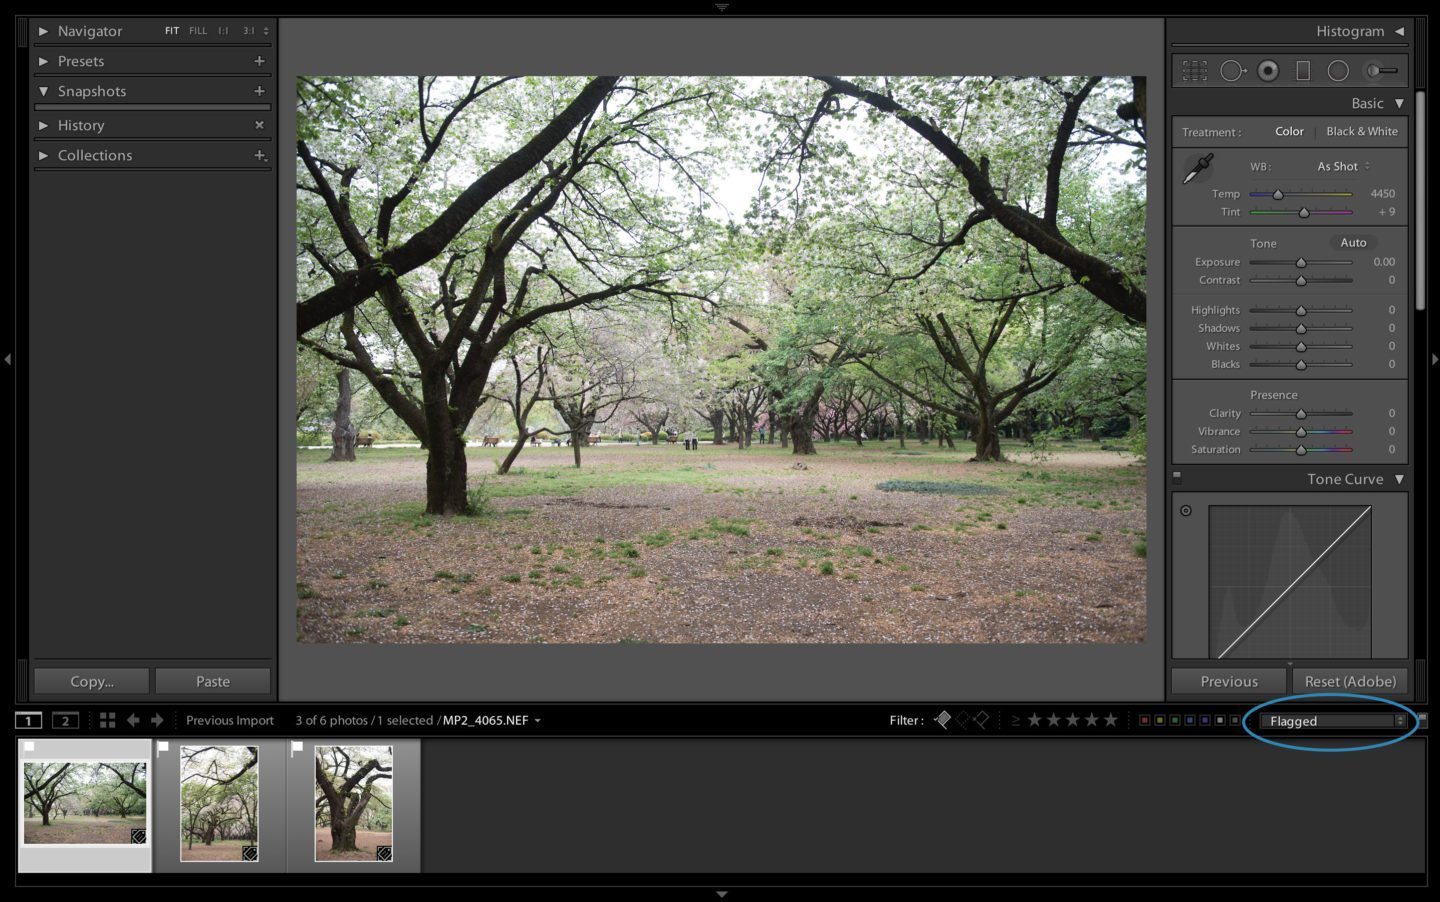
- To view my final “picks” I go to the small view bar just above my thumbnail images in “Develop” mode. I then select to view by “Flagged.” (“Flags” were added to any images I hit “P” for pick to.) You can also sort by stars/rating, colors, and other various options.
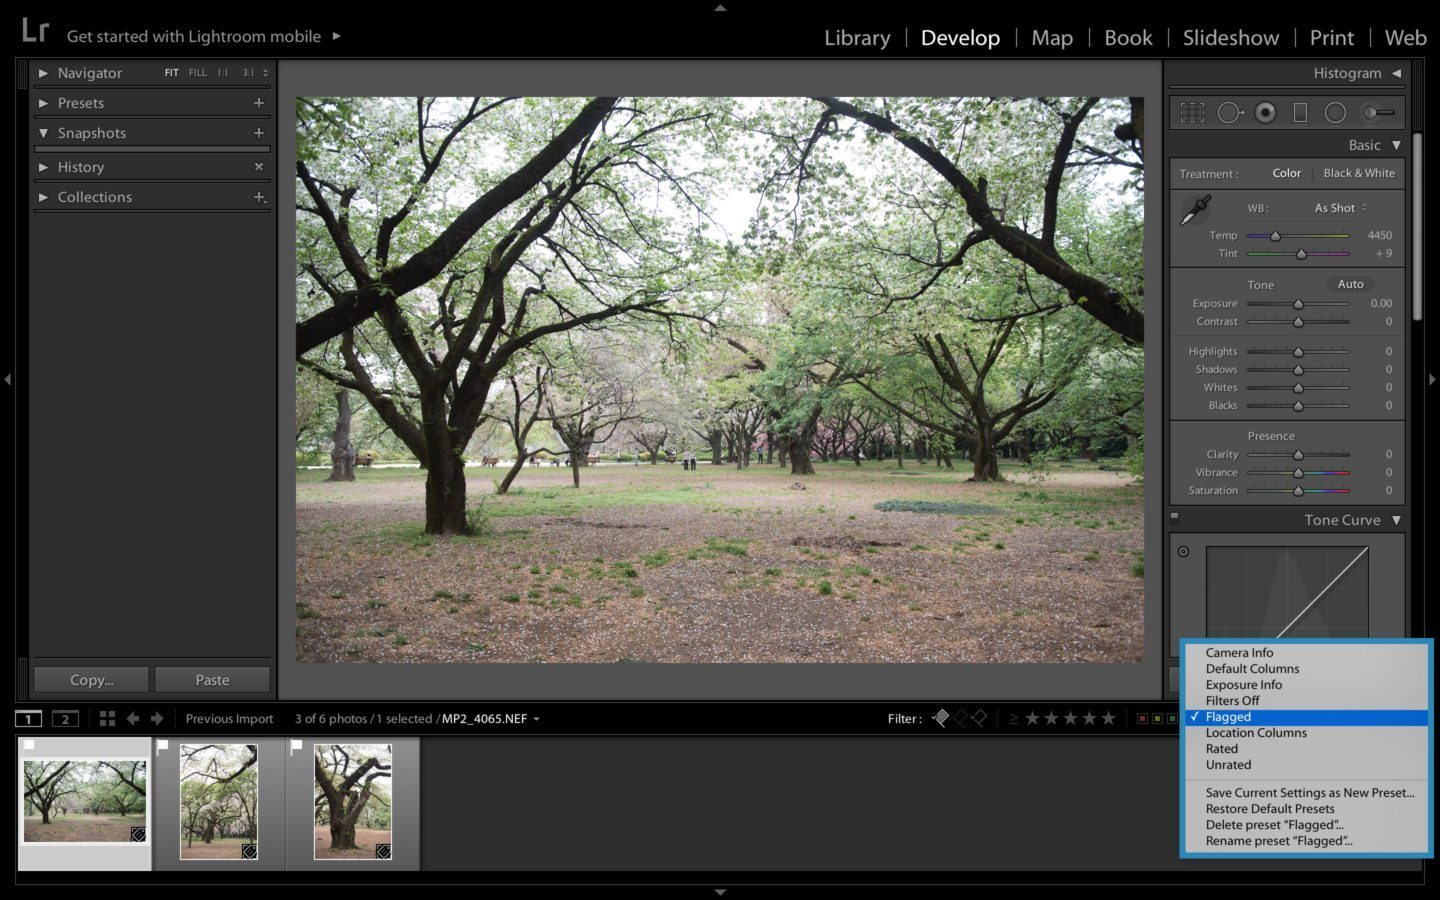
- After all my “Flagged” images are shown, I select all. On a Mac computer, the shortcut to select all is simply “Command” + “A”.
- I then go to the top navigation bar and go to “File,” “Export.”
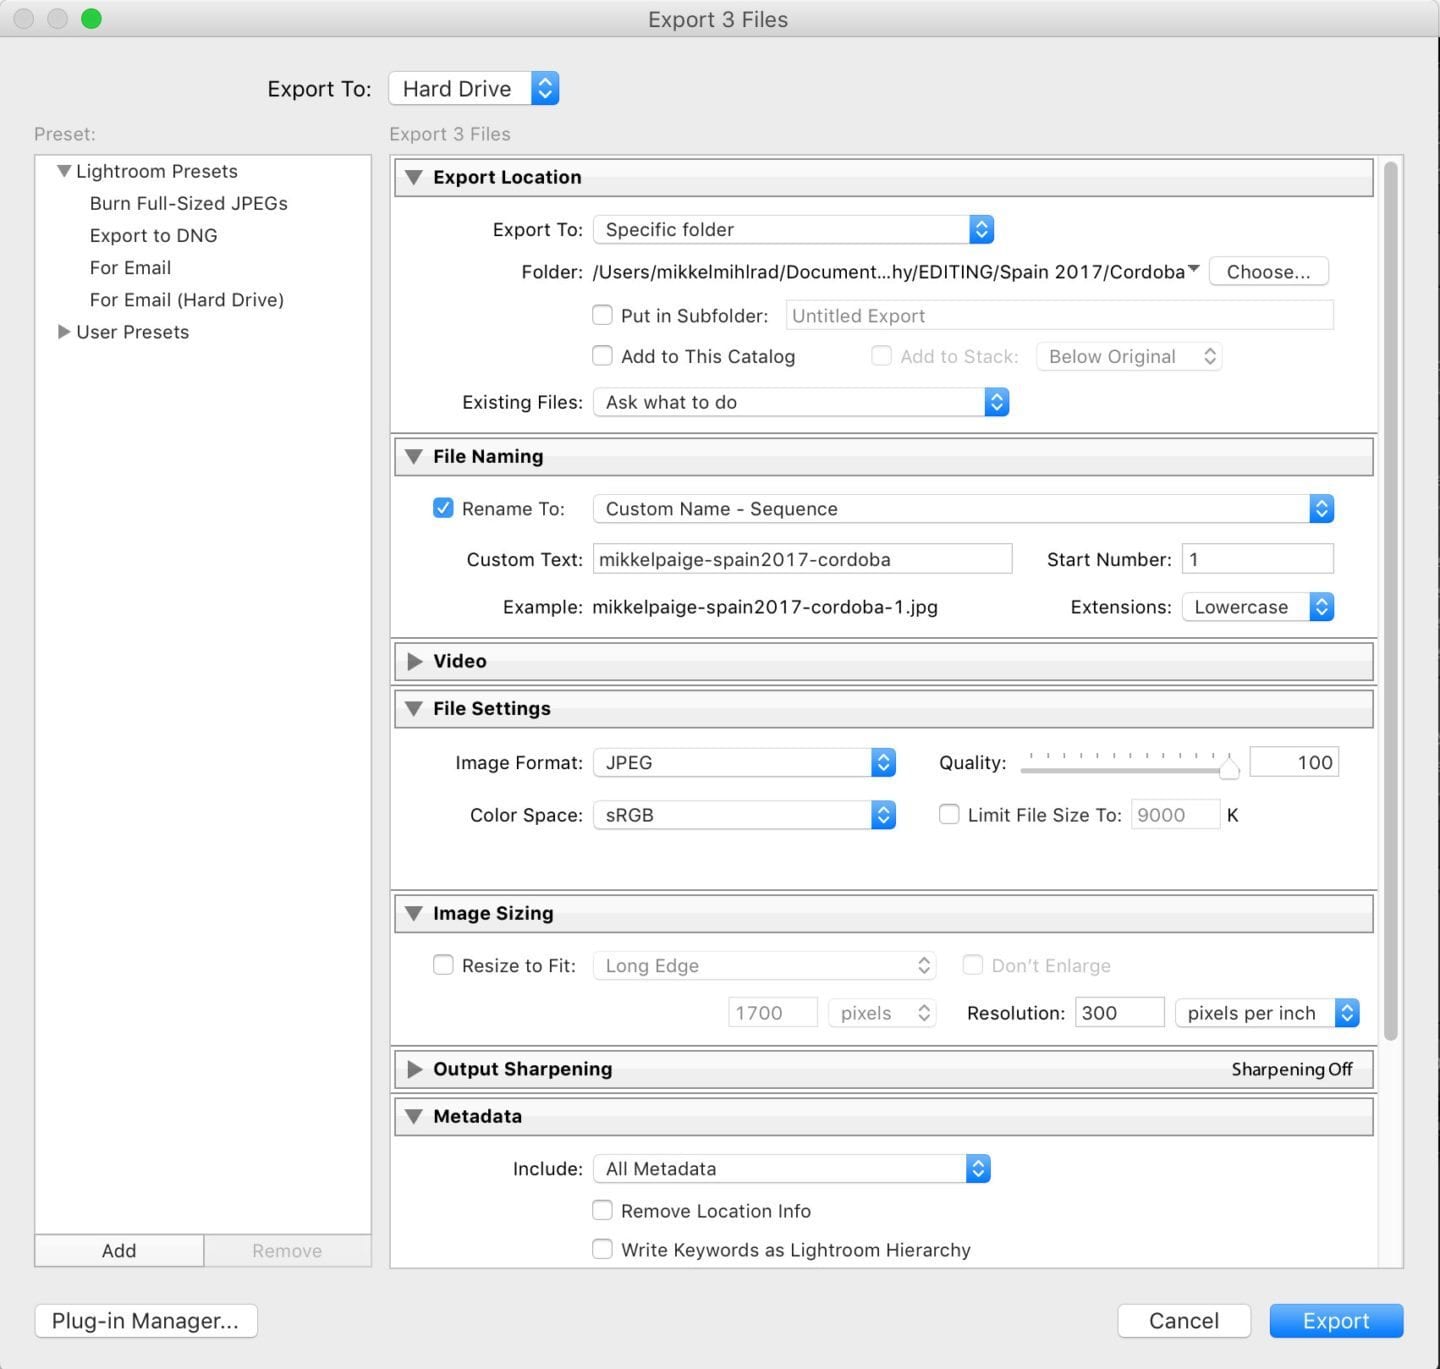
- A dialogue box will appear with a lot of export options. Don't let it overwhelm you. Just read each option as they appear.
- Export Location: I always choose my location. This is where those final selects folders we created in Part 1 come into play. For Cordoba, I go into the “Spain 2017” general folder, find the “Cordoba” folder and select that.
- File Naming: I rename the files to a custom name. I always choose “Custom Name – Sequence.” This allows my files to have numbers 1 through 100, for instance, or to however many images are in my final export. All my photo names begin with “mikkelpaige,” my photography company name.
- Video: I don't usually edit video so this option is not applicable to me. I keep that option collapsed.
- File Settings: about 90% of the time I'm exporting to JPG in sRGB color, at 100% quality. There are times I'll change these settings if I am creating content for web but I mostly don't touch them as they're always at the same settings.
- Image Sizing: I like to export at 300 pixels per inch. It's a personal preference since 300 ppi is high quality and good for printing images.
- Output Sharpening: I leave this off. Again, it is a personal image editing preference.
- Metadata: I include all metadata.
I then hit the highlighted blue button, “Export“.
Extra Retouching
I'll open any image I feel needs additional fine-tuning in Adobe Photoshop. This step occurs after the final export of my JPG files. It's rare I need to open an image in Photoshop as 98% of my editing (if not 99%) is completed within Lightroom.
Final Steps
My process concludes with uploading images to an online gallery and backing them up. I transfer my files to an external hard drive of some sort and upload them to an online server or gallery as well. As the icing on the cake, I share my gallery of trip images with family and friends!
Note that this is the culling and editing process that works for me, after years in the industry. It may not work for you. Or you may find there are bits and pieces of it you really enjoy and find useful and others you wish to tailor to your needs or improve upon, which I encourage.
Need additional tips on photography? Check out:
- How to Organize and Edit Your Travel Photos: Part 1
- Behind the Scenes: Best Way to Resize Images without Losing Quality for Web
- Our Maximum and Minimal Travel Photography Gear Lists
If you have any questions or comments regarding this process we want to hear from you! Post in the comments below. We reply to every comment and we’re happy to help out!


So, I read all this.
Your process is very similar to mine, which I find comforting. My biggest problem is getting off my lazy butt to actually go through them all.
There’s always so many.
I find it comforting too! Haha I find the less I procrastinate the more inclined I am to get them edited quickly!